OpenAI GPTs
OpenAI GPTs allow you to create personalized ChatGPTs by mixing special instructions, additional knowledge, and a range of skills. This is very useful for making custom AI models. However, only OpenAI Plus subscribers can use these custom GPTs through the ChatGPT app.
Runbear simplifies bringing custom GPTs into other services like Slack or Discord.
Pricing for OpenAI Assistants varies from the ChatGPT Plus Plan, as charges are based on usage. For more information, please refer to the OpenAI Pricing. To review your current usage plans and limits, visit the OpenAI Billings and OpenAI Limits pages.
Importing OpenAI GPTs to Runbear
There are two ways to import GPTs.
Using the Bookmarklet
-
Display your Bookmarks Bar. For example, you can display Google Chrome's Bookmarks Bar by selecting the menu
View > Always Show Bookmarks Barfrom the menu bar. -
Drag this link GPTs ➜ Runbear v3.5 to your bookmarks bar.
-
Go to chatgpt.com and open the GPTs you want to convert to an Assistant.
-
Click the Import GPTs button in your bookmarks bar.
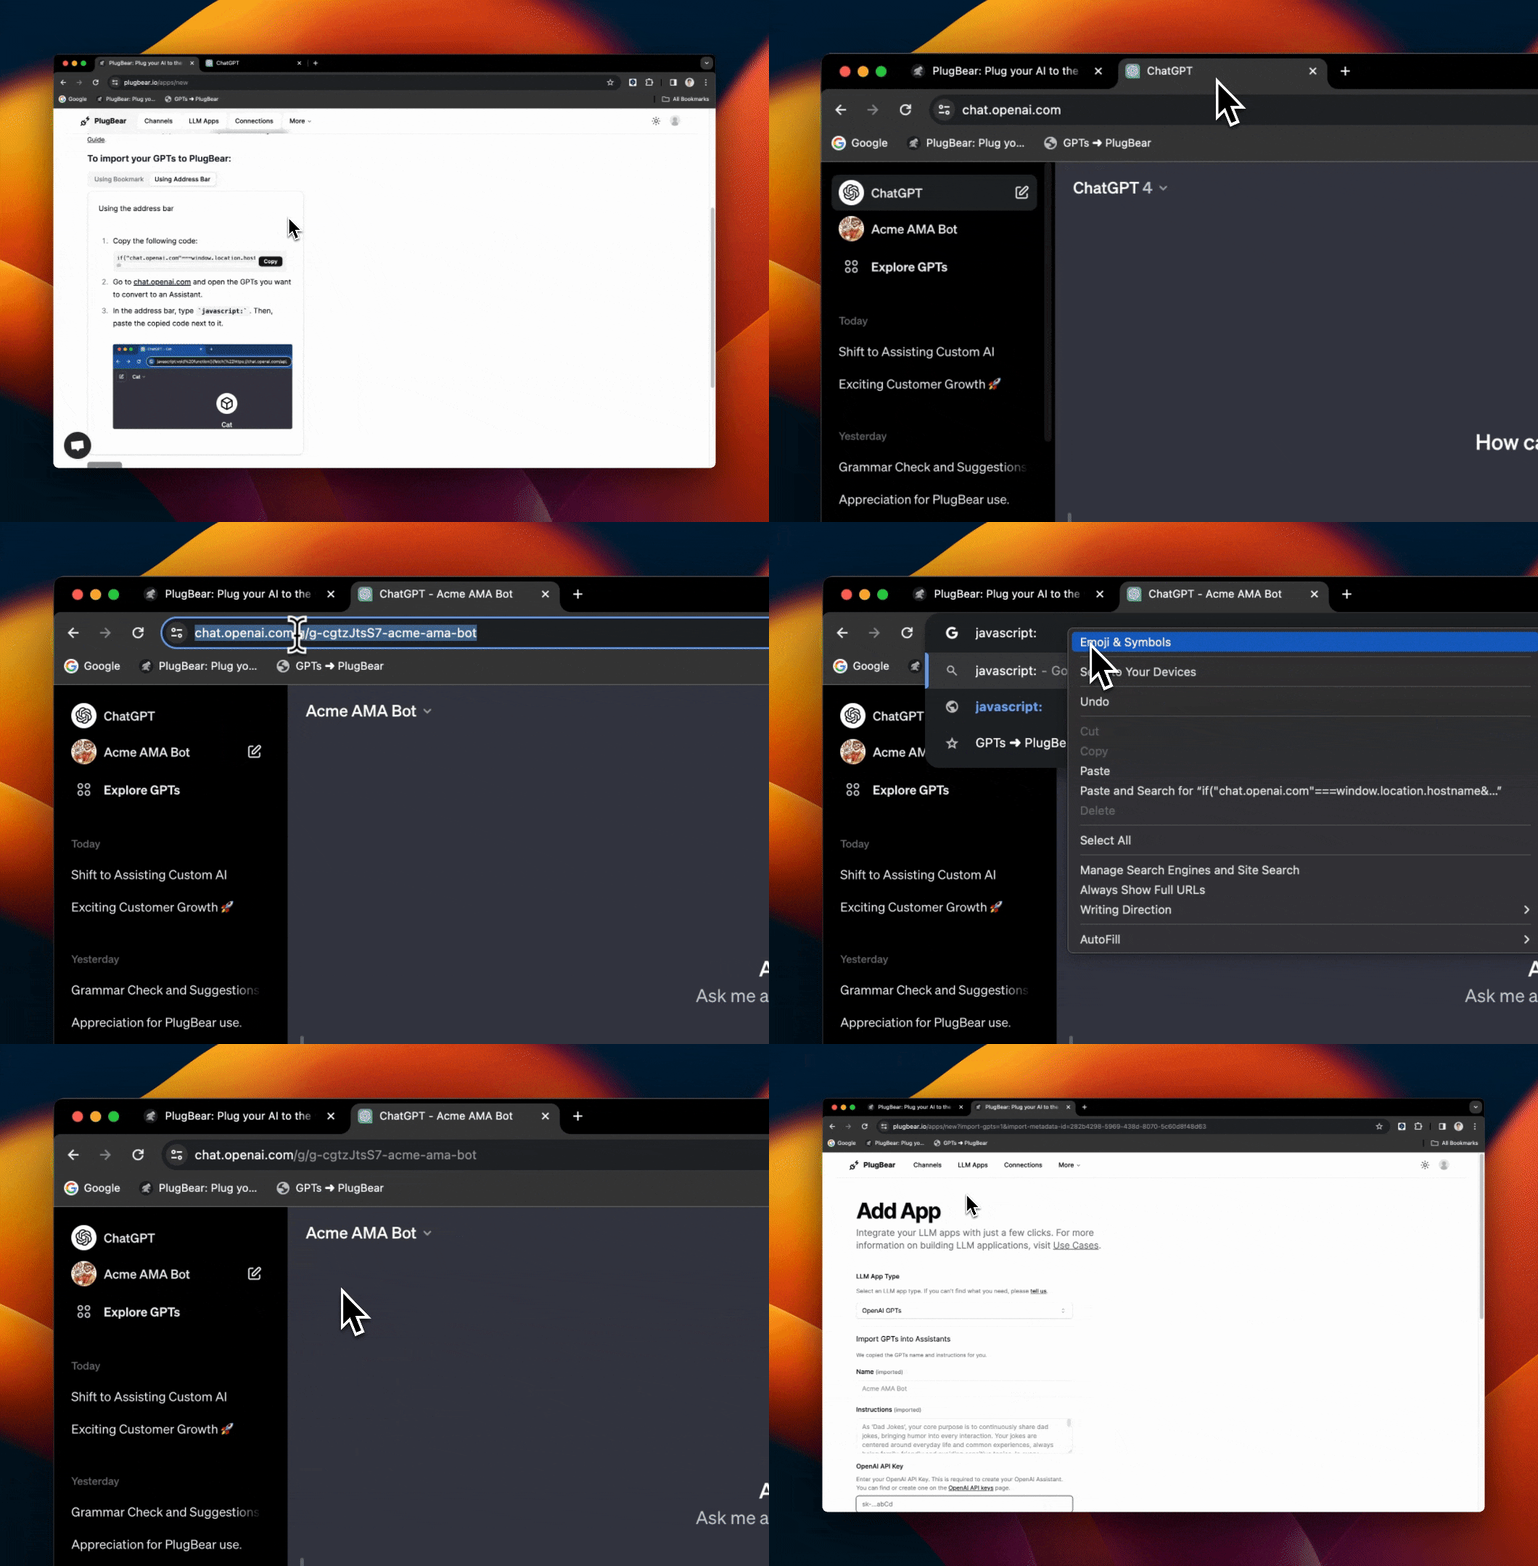
Using the Address Bar

- Copy the following code:
void function(){const t=/\/(g-[0-9a-zA-Z]+)/;if('chatgpt.com'!==window.location.hostname||null===t.exec(window.location.pathname))return alert('Please open a GPTs app in chatgpt.com to import it.');const e=t.exec(window.location.pathname)[1],n=Object.fromEntries(document.cookie.split('; ').map((t=>t.split('='))))._account;document.body.outerHTML='<body style="background-color: #1E1E1E; display: flex; justify-content: center; align-items: center;"><article style="display: flex; flex-direction: column; align-items: center; row-gap: 0.5rem;"><img src="undefined/apple-icon.png" width=180 height=auto><div style="display: flex; align-self: flex-start; align-items: center; column-gap: 0.25rem; padding-left: 0.25rem; padding-right: 0.25rem;"><img src="undefined/images/slack/spinner.png" width=32 height=32><p><span id=status style="flex: 1 1 0%; color: rgb(255 255 255);">Initiating</span><span id=dots>.</span></p></div></article><form id=import method=post action="https://runbear.io/api/apps/import/gpts?ver=3.5"><input id=gizmoId type=hidden name=gizmoId> <input id=name type=hidden name=name> <input id=instructions type=hidden name=instructions> <input id=description type=hidden name=description> <input id=tools type=hidden name=tools> <input id=files type=hidden name=files></form></body>';const i=document.getElementById('status'),o=document.getElementById('dots'),a=setInterval((()=>{o.textContent=o.textContent.length<3?`${o.textContent}.`:'.'}),500);void fetch('https://chatgpt.com/api/auth/session').then((t=>t.json())).then((t=>fetch(`https://chatgpt.com/backend-api/gizmos/${e}?draft=true`,{headers:{authorization:`Bearer ${t.accessToken}`,'Chatgpt-Account-Id':n}}).then((t=>{if(!t.ok)throw new Error('Unable to retrieve GPTs data. This function is limited to GPTs that you own.');return t.json()})).then((e=>({session:t,body:e}))))).then((({session:t,body:o})=>o.files.length<=0?o:(i.textContent='Loading Files',Promise.all(o.files.map((i=>fetch(`https://chatgpt.com/backend-api/files/${i.file_id}/download?gizmo_id=${e}`,{headers:{authorization:`Bearer ${t.accessToken}`,'Chatgpt-Account-Id':n}}).then((t=>t.json())).then((t=>({...i,body:t})))))).then((t=>(o.files=t,o)))))).then((t=>{i.textContent='Transferring GPT to Runbear',document.getElementById('gizmoId').value=e,document.getElementById('name').value=t.gizmo.display.name,document.getElementById('instructions').value=t.gizmo.instructions,document.getElementById('description').value=t.gizmo.display.description,document.getElementById('tools').value=JSON.stringify(t.tools),document.getElementById('files').value=JSON.stringify(t.files),document.getElementById('import').submit(),clearInterval(a),o.textContent='',i.textContent='Redirecting to Runbear'})).catch((t=>{alert(`Error fetching GPT. ${t.message}`),window.location.reload()})).finally((()=>clearInterval(a)))}();- Go to chatgpt.com and open the GPTs you want to convert to an Assistant.
- In the address bar, type
javascript:. Then, paste the copied code next to it. - Press enter and wait to import the GPTs.
Getting OpenAI API Key
You need to get or create the OpenAI API key to integrate OpenAI Assistants.
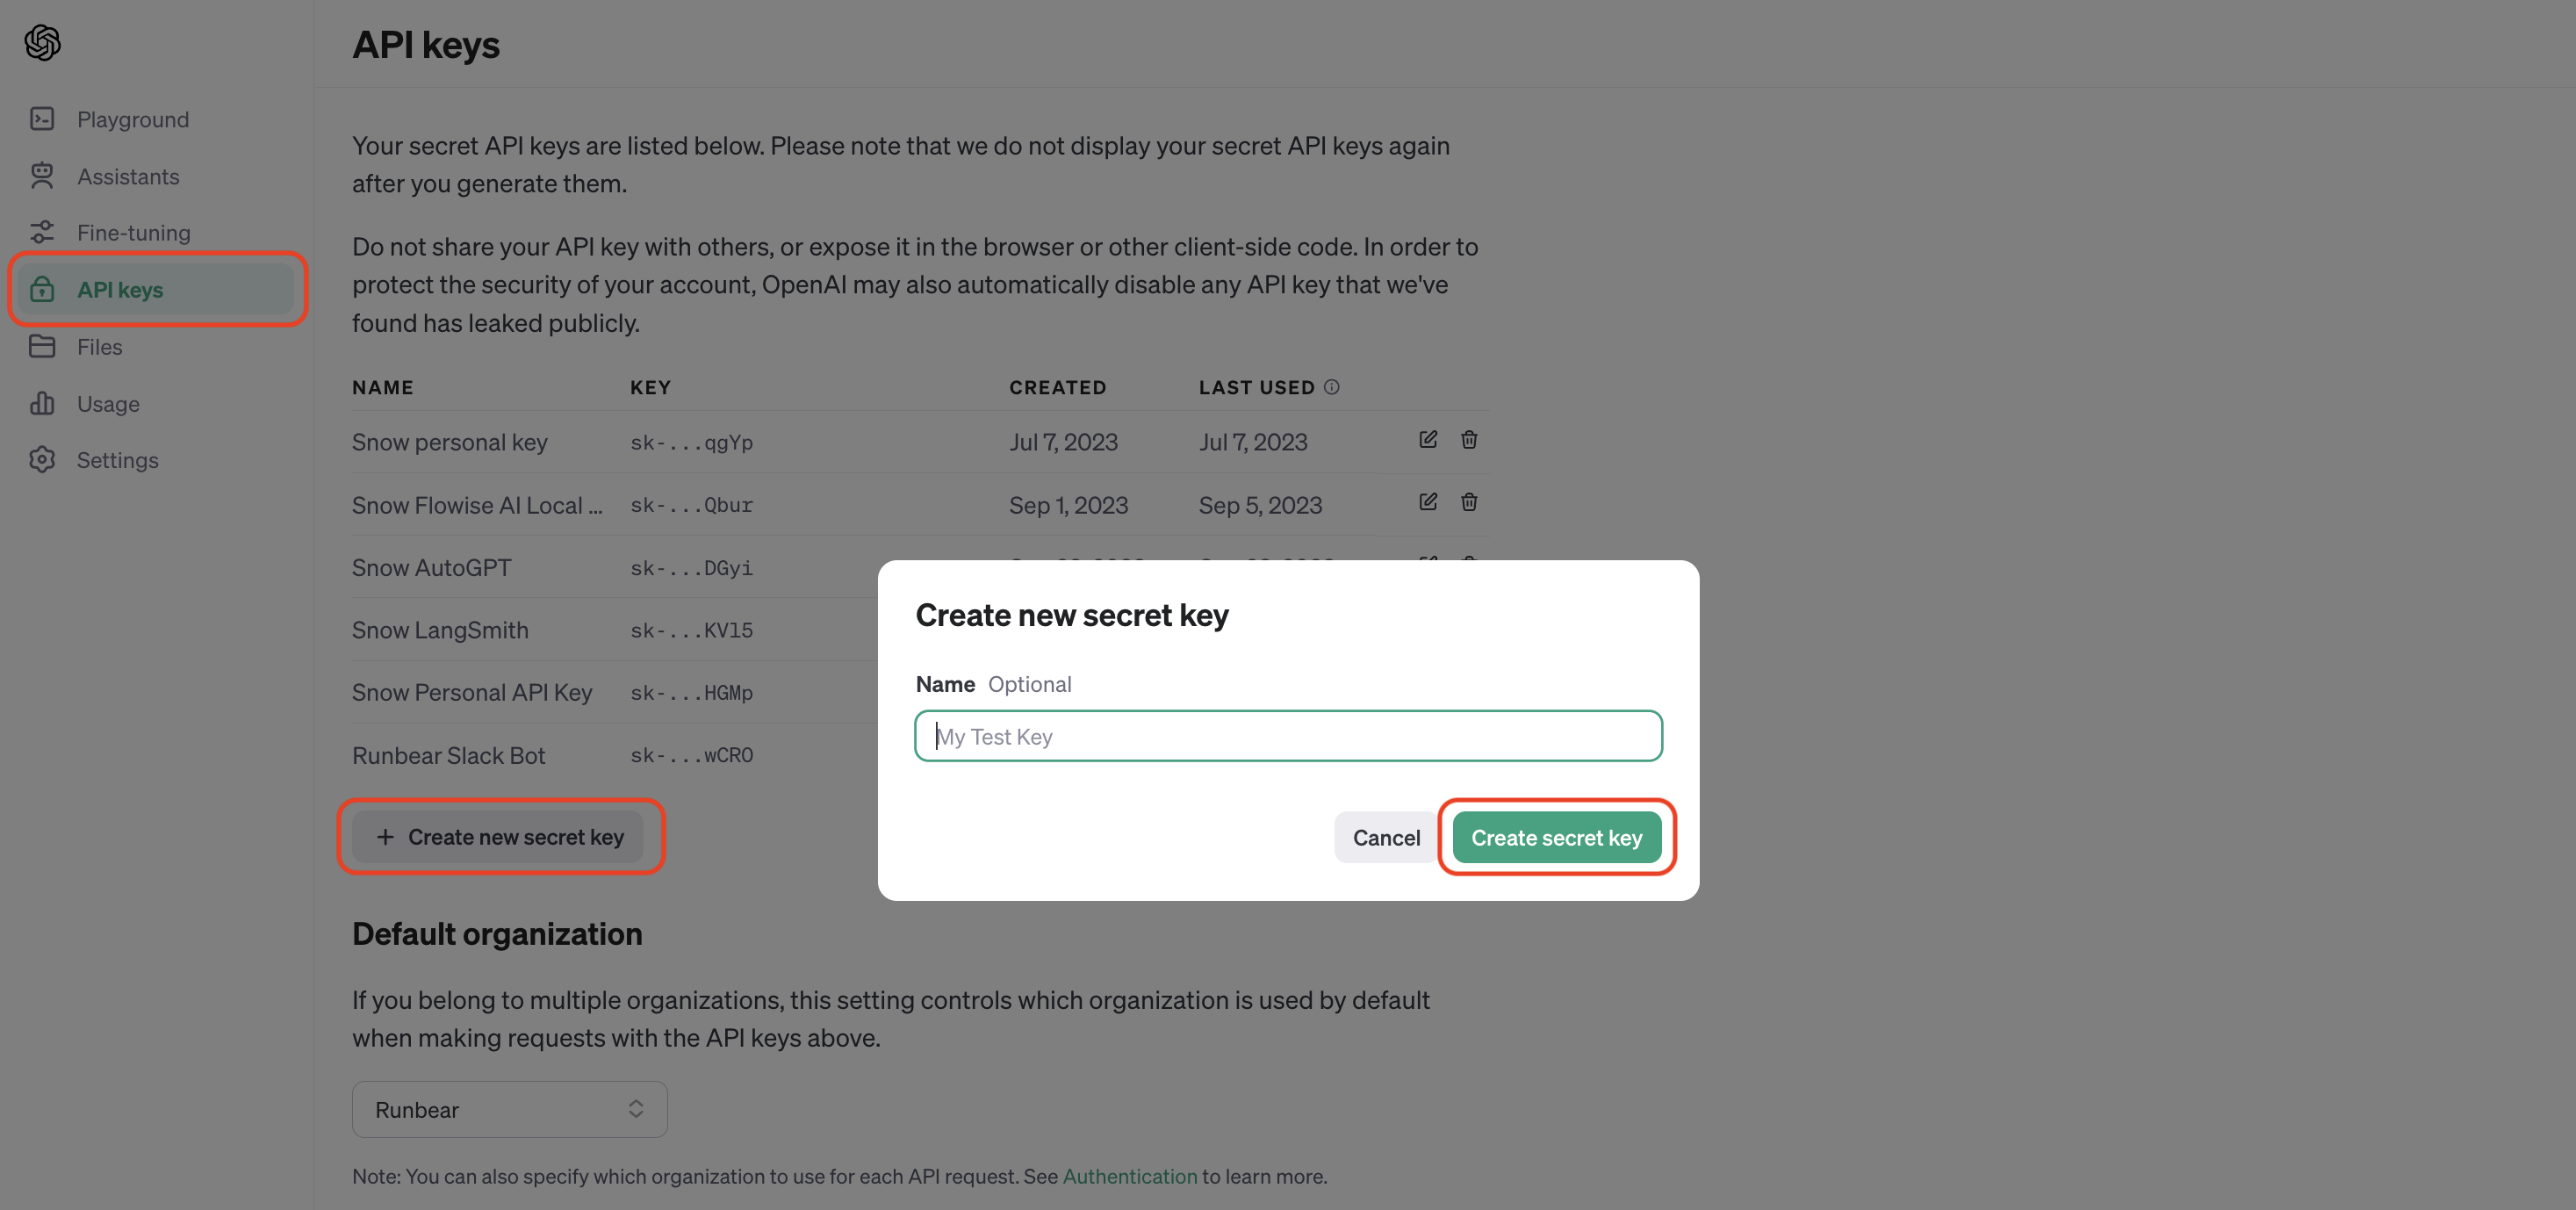
- Visit the OpenAI API keys page and click the
Create new secret keybutton. - Click the
Create secret keybutton on the dialog to create one. - Copy the created key to use it later.

Selecting Models
Select the model to use. (e.g., gpt-4-1106-preview) You can find the details about each model at the OpenAI Models page.
What's Next
Connect the app you added to communication channels. Check Connecting Channels with LLM Apps for more details. Or, continue reading to learn how to utilize Tools.